
45 Paint Hacks To Save Time And Money On Home Jobs And Touch-Ups
Sometimes, the most ambitious and fantastic home projects result from a person who just wanted to do something out of boredom. A few of these DIYs include many complicated projects that were finished only with the help of a YouTube tutorial. People have done it all, from doing complex things like building treehouses and failing to convince people that it’s safe, to easy tasks like painting their own houses. Now, painting a house does sound comparatively simple. But, you know what sounds simpler? Painting a wall. That does sound simple, but on the downside, it could also change the whole vibe of a room. So, irrespective of what you wish to do or what painting project you want to take up, here are some tips that you should know before you go on to pick up a brush.
Concrete planning
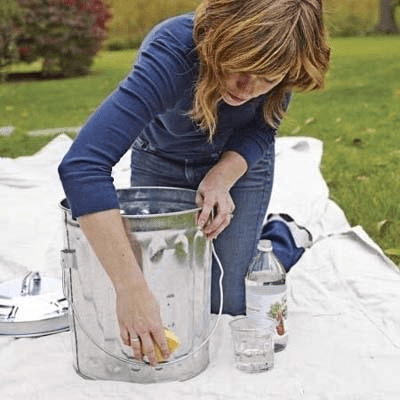
Just like any paint job, cleaning and treating the surface you’d be painting on is a great thing to do. When you do that, the color on it lasts for a really long period of time and in a very good condition, too.
If you let a layer of white vinegar soak into the concrete and then dry, it would be even better! It makes the concrete paint more adhesive while also preventing cracking. Lastly, finish with a concrete epoxy or polyurethane layer to ensure that it lasts long.
Save yourself
We all know that painting is quite a messy task, so let’s just get that out of the way. But, just because it’s messy, it doesn’t mean that it will be a lot of trouble for you. The mess is quite natural, and it can be controlled.
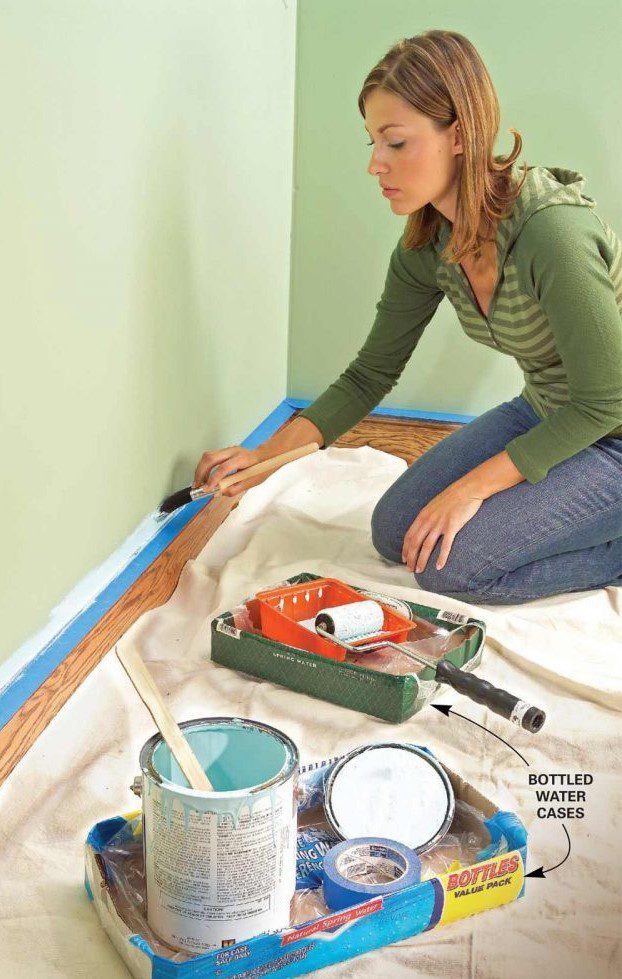
After a project, you’d probably want to look around at the result and worry about cleaning up after. We understand that completely! To make it happen, consider keeping your paint supplies in a water bottle case. They’re thick and sturdy, so they’ll help to prevent spillage.
Easy stripping
For those who don’t know, stripping furniture is when you remove the paint-covered finishes from old pieces of furniture for restoring them. It’s a pretty time-consuming activity that also requires you to use smelly chemical solutions. Try this hack to get the job done quicker.
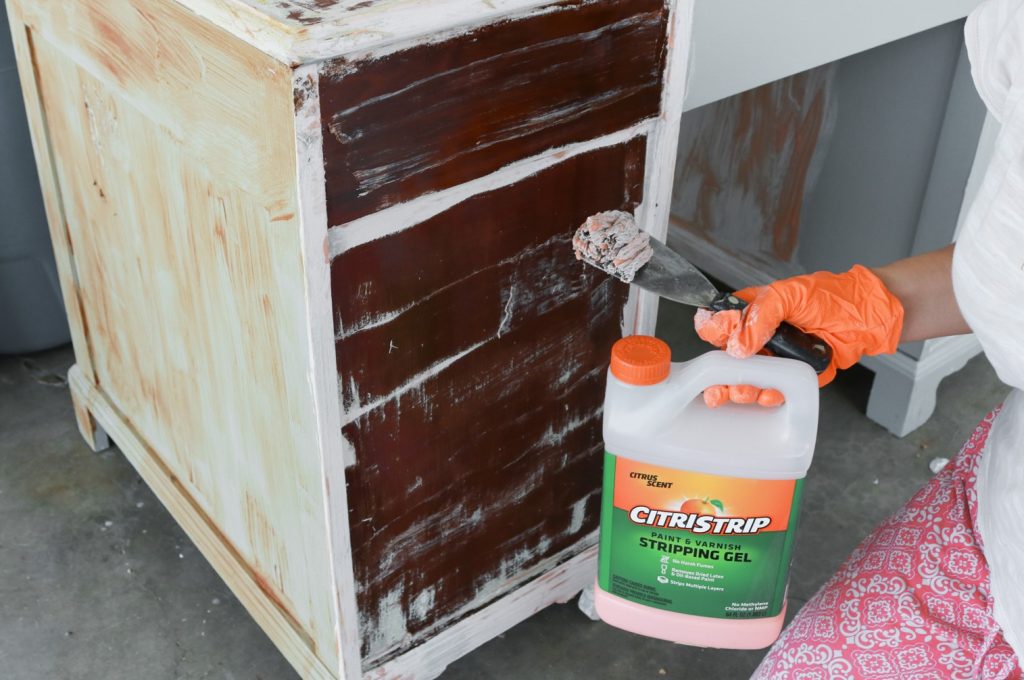
You need to do a good job here. For that, use Citristrip. It can ease the process for you while also protecting your hands from corrosive materials. It’s great for indoor usage since it doesn’t smell. Apply it, cover the furniture in a plastic bag, and strip it the next day.
Vaseline
Have you ever dyed your hair at home? If you have, then you must know how frustrating it gets when some of the dye stains a part of your body it wasn’t supposed to. That stuff just gets everywhere. When you’re painting, it’s pretty similar.
But you can avoid those stains. You only need to apply a bit of vaseline to the areas you wish to protect. It works really well for screws, sockets, hinges, and so on. It saves all of them from being stained with paint.
A new perspective
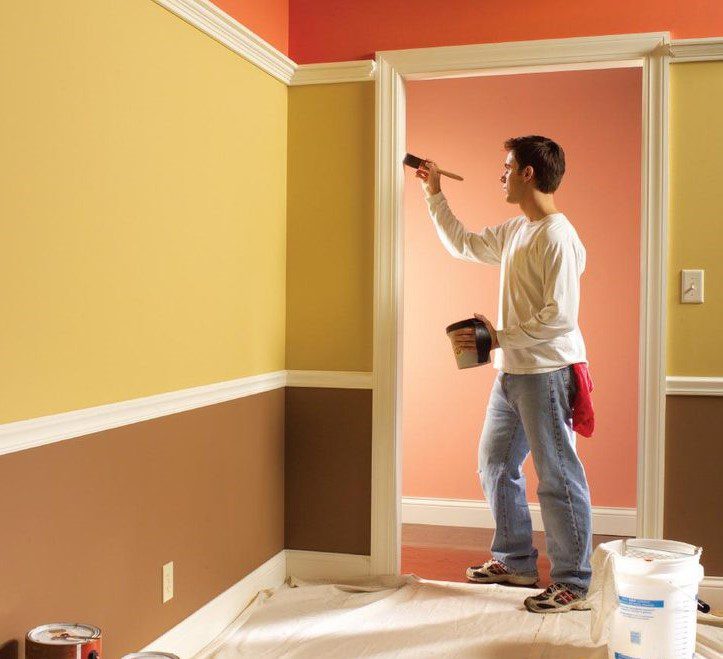
The ornamentation you see around door frames, better known as painting trim, is really tricky. The border needs to be painted with precision since it needs to be decorated well enough. But, it gets challenging because of the patterns and creases.

Therefore, you should use an angled brush since it will help you cover every single inch with little to no mistakes while also reducing the need to place the protective tape. The angled brush will also help the paint by getting inside every crevice without hassle.
Wiping the extras
Let’s face it. Painting trim can leave stains or paint drops that drip off the brush. Even when you have an angled brush, it is possible. It could also leave an accidental paint stroke near the surface around the trim if you aren’t attentive.
On the bright side, there is a simple way to prevent such accidents. It’s as easy as keeping a wet rag with you all the time so that you can wipe all the mess that’s created. It’s quite a simple and effective solution.
Get rid of the mop
Let’s assume that even after everything, a few drops of paint go unnoticed and fall on the floor. Firstly, that’s rogue paint, and secondly, it’s more troublesome than you think. If you mistakenly step in it, you’d be leaving paint tracks all over the place.
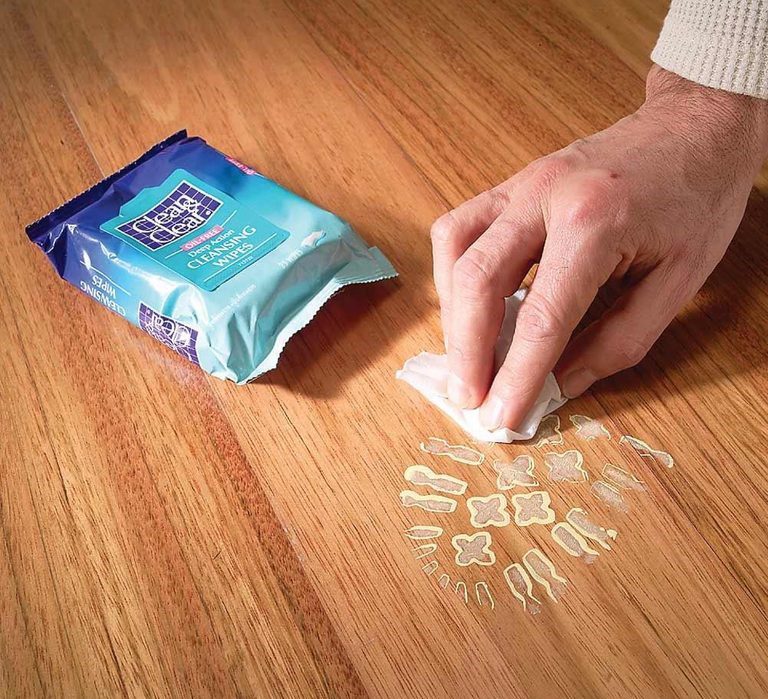
For this, you shouldn’t use a mop since it could smear the paint and get ruined in the process. Cleansing wipes usually used for acne is a good solution. They’re easy to find, and the alcohol-based wipes clean off the rogue drops with ease.
Precision tips
There might be many of you who would be proud of yourselves for your perfectly-done paint jobs. There might also be many of you who would be getting frustrated by the fact that a well-painted wall got ruined by a few drops of paint in the corner.
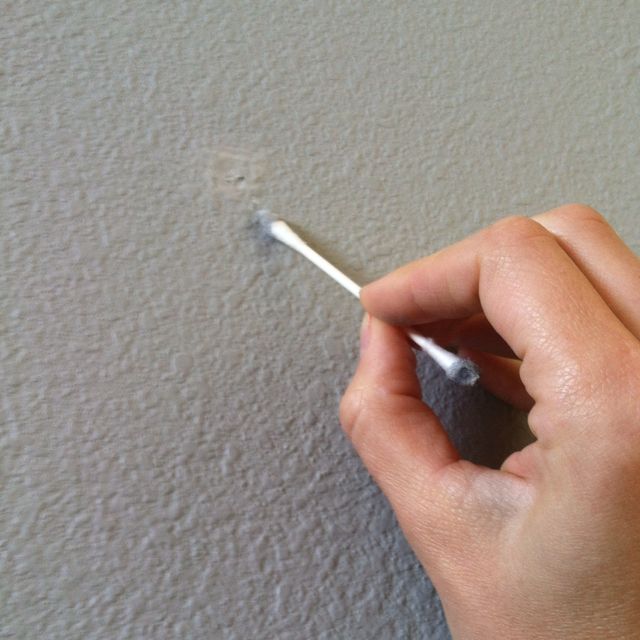
Even if you’re not the kind to get upset over a few stray drops, you should consider using precision tips since they are great for the small streaks on the wall. But, if you can’t find them, you can DIY it by wetting and twisting cotton to a point!
Ziploc and Pringles help
Most of you must know that roller brushes have this tendency to dry up right around the edges exactly when you keep them aside for some time. All of it could be happening when you keep them aside after calling it a day or when you step out for an errand.
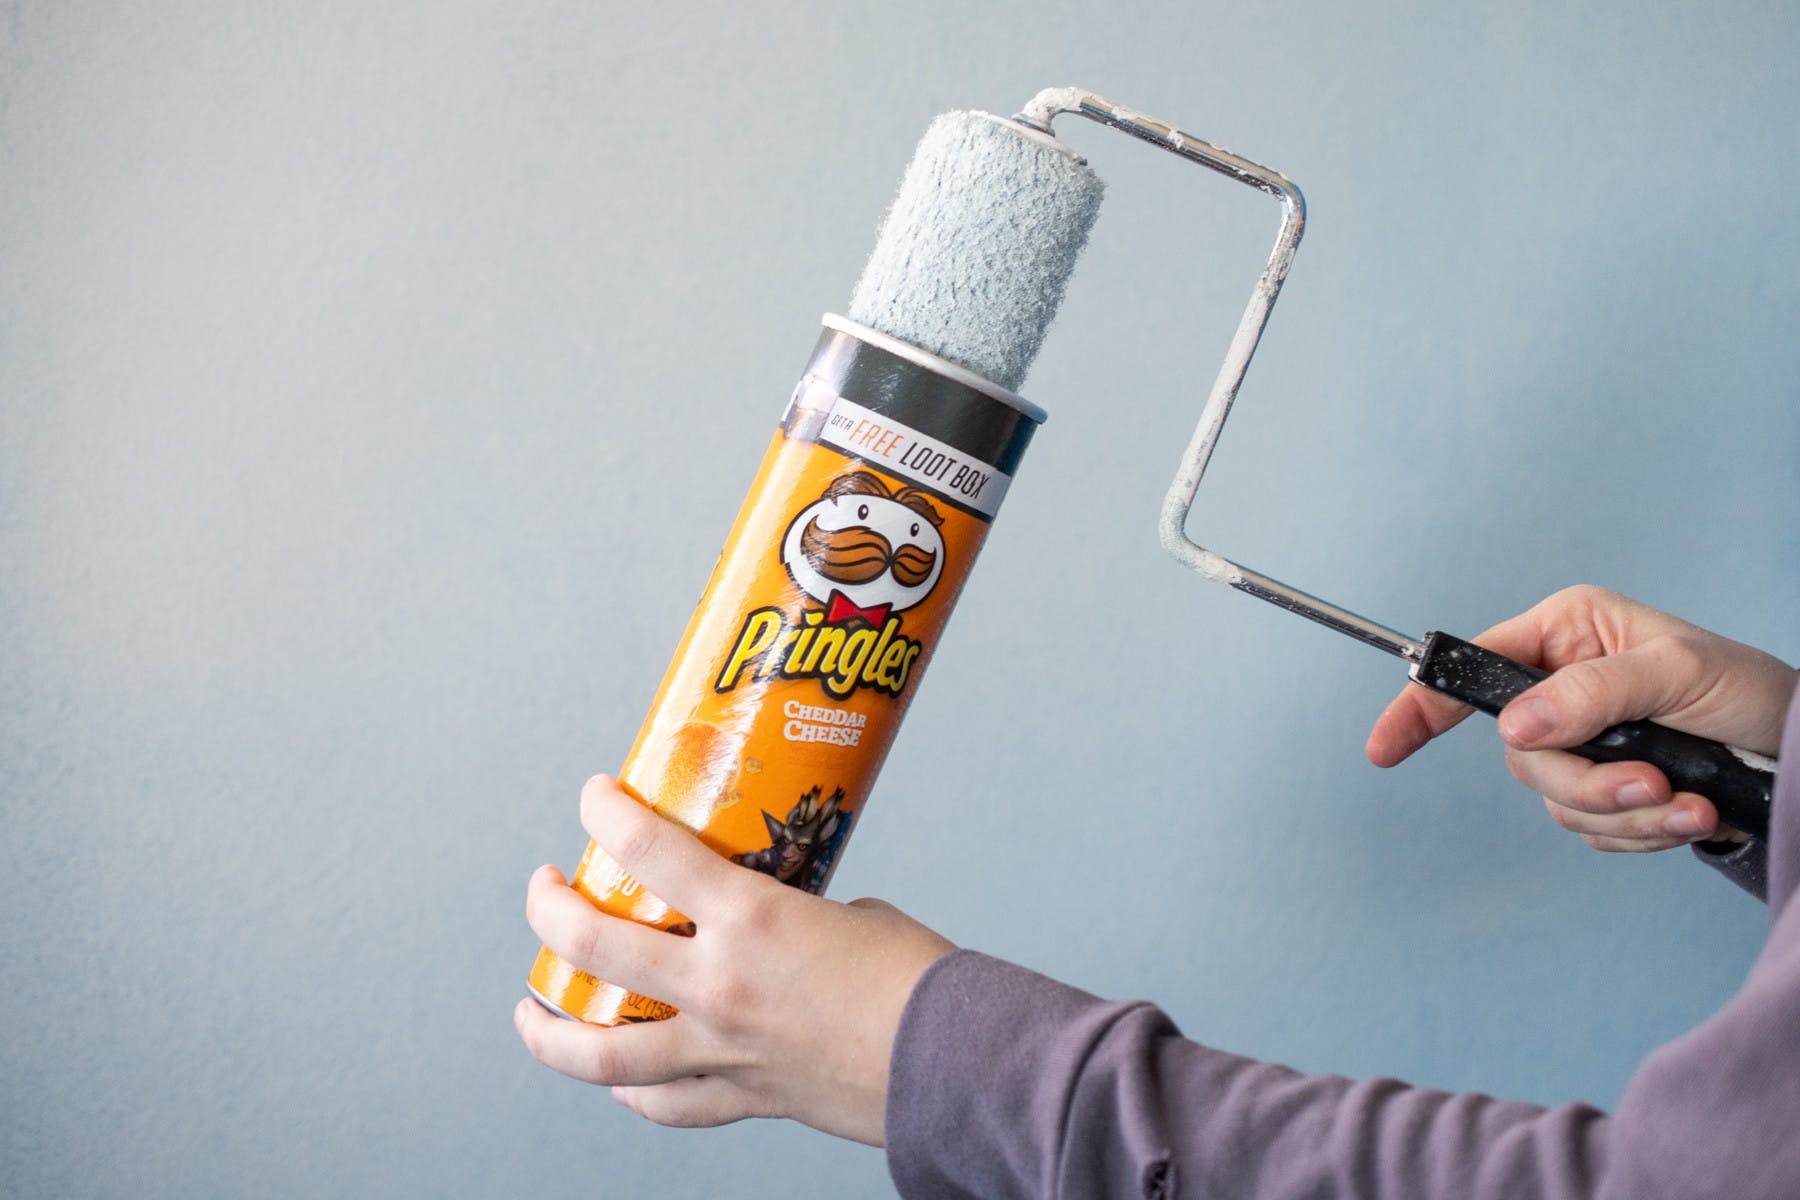
Once you learn this tip, you don’t need to worry about roller brushes. All you need to do is detach the roller brush from the handle and stick it in a Ziploc. Once that’s done, sit back and relax. After you’re done, keep the bag in an empty can.
Crystal clear
Just like your rolling brush needs some work, so do the walls. They also need some prep work before a painting job. Irrespective of how much we clean your house, many of us never think about giving our walls a much-need scrubbing, right?
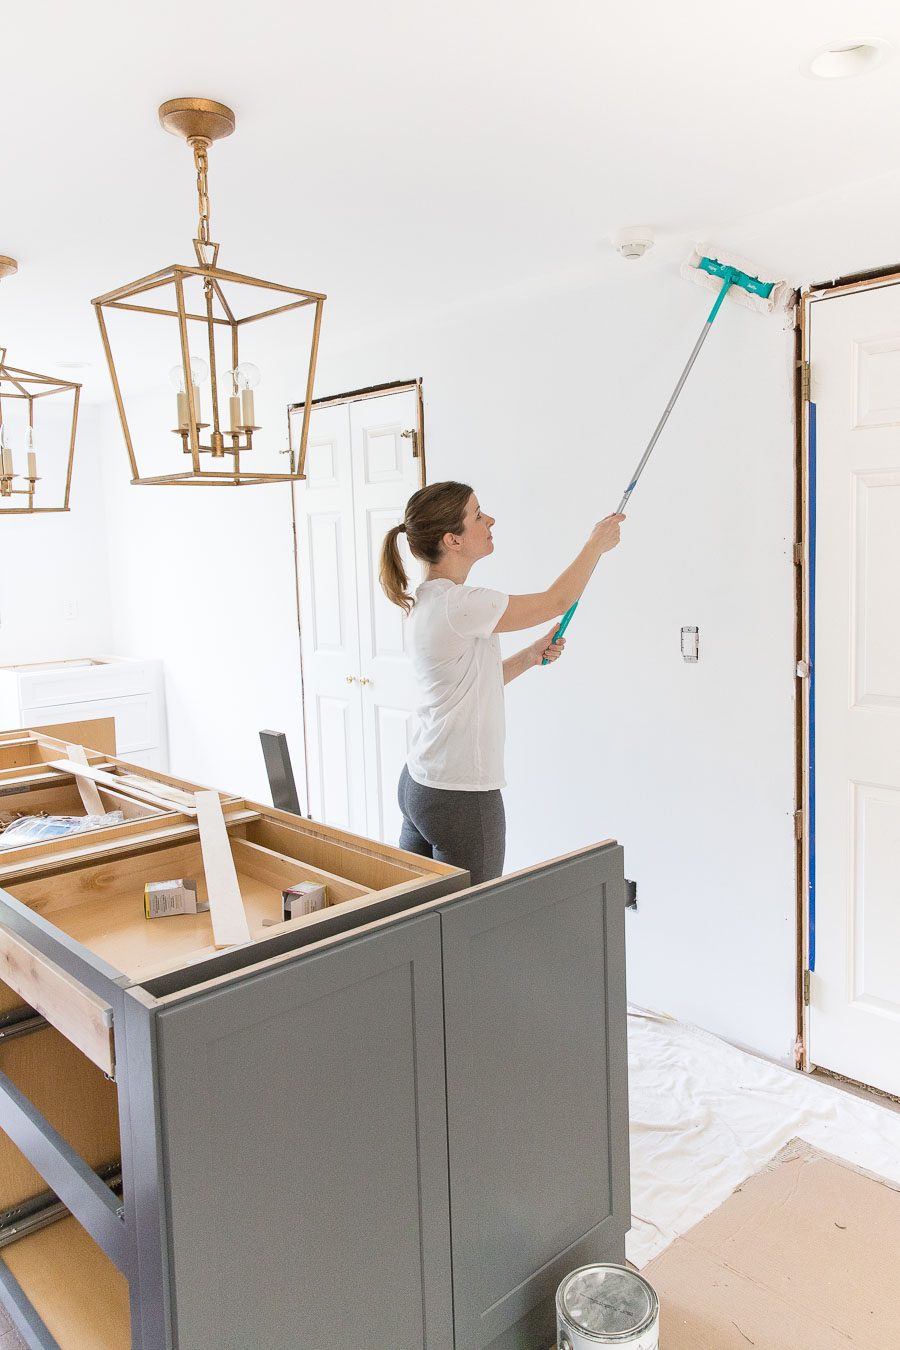
Well, once again, that’s precisely what needs to be done here. Giving the wall a small wipe would be significantly easier than dealing with the dusty mess later on. For this task, a Swifter stick with a towel will do the job quite well.
Reuse
There are two really bad things about painting your home by yourself. Firstly, it’s not getting done by a professional, and secondly, you have to deal with cleaning things up after painting. A tray, a brush, and paint are essential supplies in this case.
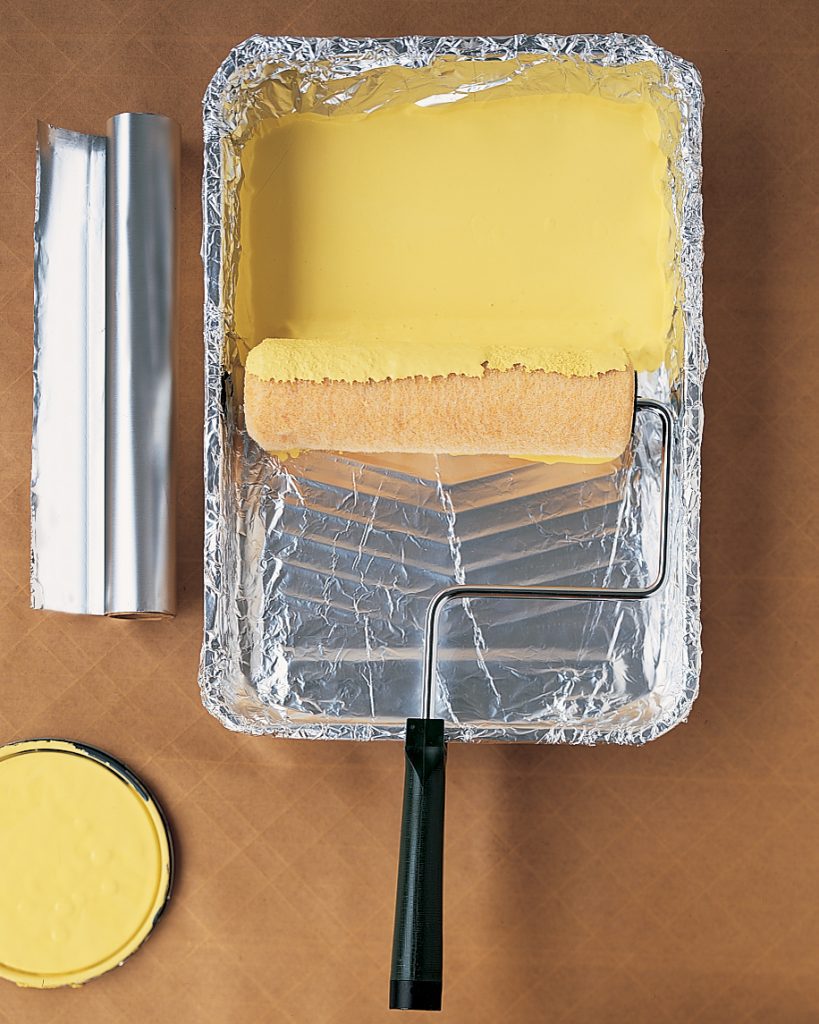
Washing the tray can be a bit difficult, and it’s all the more complicated if the paint dries in between long breaks. But, if you line the tray with plastic or foil, you wouldn’t have to spend a lot of time cleaning the trays anymore.
DIY project
Imagine you’ve had a hard day painting the walls and are ready for a well-deserved break. You finally put down your brush, but you realize that you have set the paint-filled brush down on something you weren’t actually supposed to. Isn’t that incredibly frustrating?
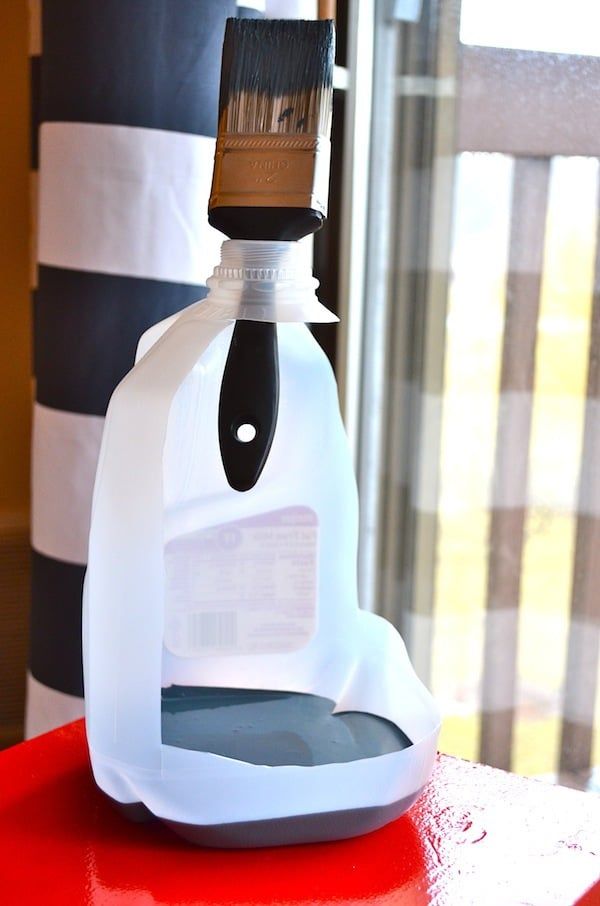
The solution to this annoying problem rests inside your refrigerator. Finish the milk in that jug, and cut a side of it so that you can keep the brush in the spout while filling the bottom part with paint. How convenient!
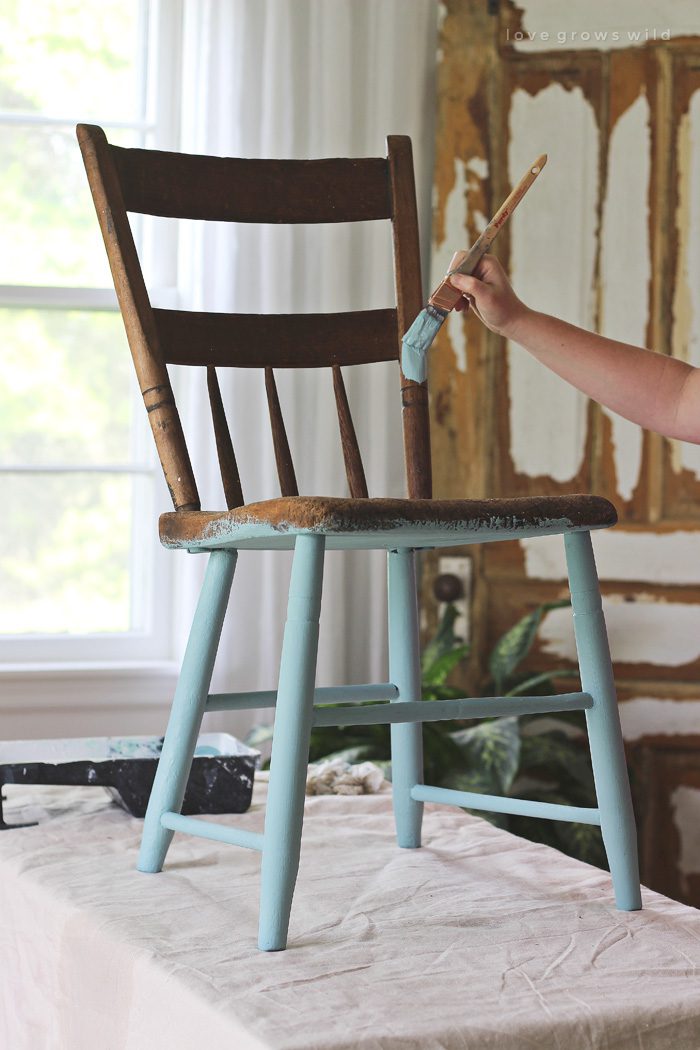
A smart one
Looking around our homes, sometimes inspiration strikes and we want to touch up an old chair. It’s a simple enough job, so we’d rather do it ourselves than call a professional. When such a day comes, there’d obviously be a problem if you start painting from the top and then flip things over.
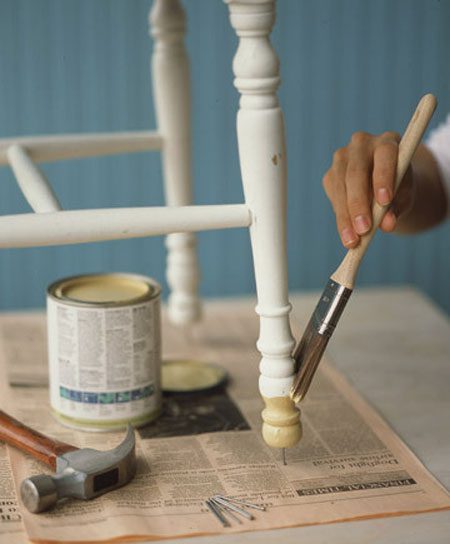
It’s obvious. Gravity won’t be so nice to a flipped-up piece of furniture. But, if you can tap a nail into the bottom of the legs, you can easily paint without flipping the thing over. Isn’t it one smart idea?
Touch-ups
Do you know what’s excellent about furniture? Nobody checks the nooks and crannies of all the pieces every six months to ensure if it is all free of dust or if it is perfectly varnished. But, it’s time for you to get working if the paint needs a touch-up.
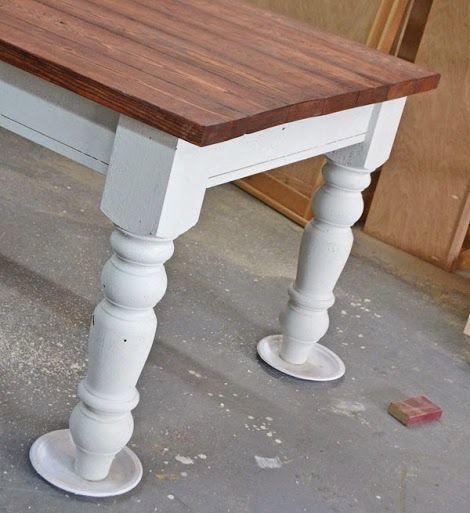
Now, there’s a really simple way to touch up your table. It’s just like you’d paint a chair, with the only difference being that you need to swap the nails on the bottom for paper plates. It will help make sure that you have an even coat on the legs, too.
Paint-stirring stick
Here’s the thing. Nobody wants to clear the whole room just because somebody will be painting it. There are many problems with doing that, with the first one being that you’d have to shift the things in the room to another place.
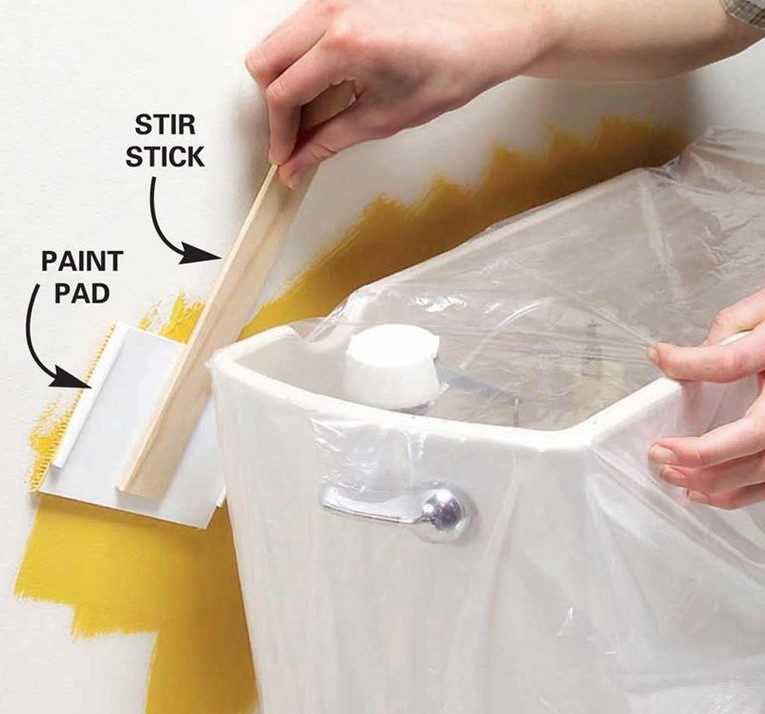
It’s an even bigger problem if you live with a roommate or don’t have space to move things. A paint pad attached to a stick is an excellent tool for the job, given that you’re not moving things around and disturbing everybody in the room.
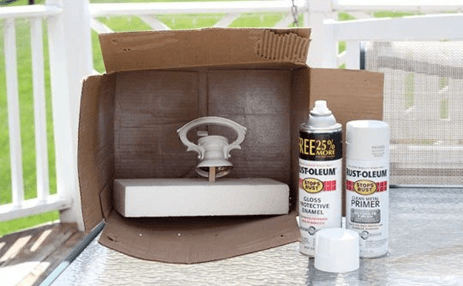
DIY spray can
Suppose you have some decoration pieces that you’d want in a specific color, but the existing shades don’t match the energy you were expecting. In that case, painting them would be a good option, but spending a lot of time on them isn’t ideal.
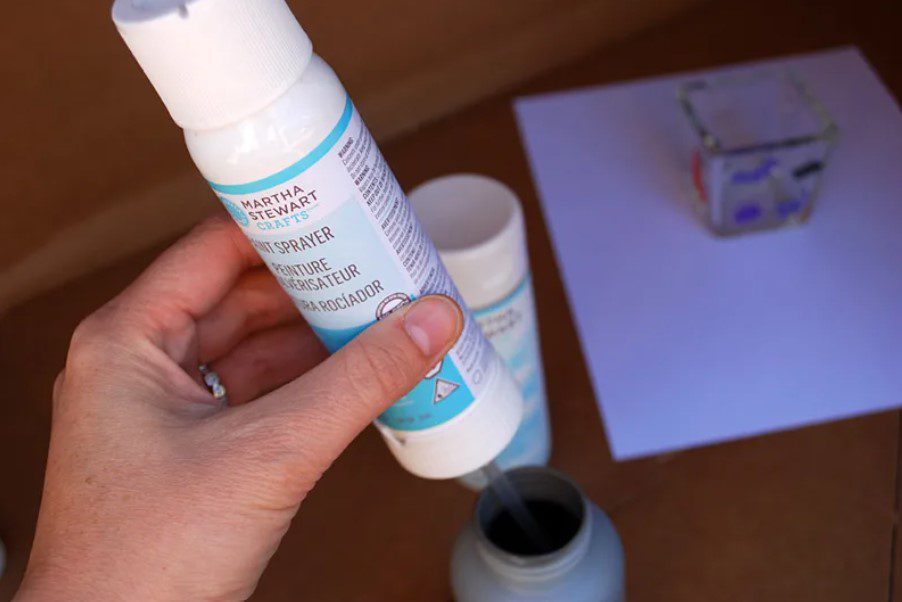
After that, what would you do if you realized that you didn’t even have enough spray color? Well, don’t you worry. Martha Stewart has a fantastic DIY spray can solution. You only need to mix the color to obtain the shade you want. Follow the instructions on the kit, and you’re good to go.
Helpful techniques
Although it’s really tempting to start chucking some paint on a blank wall, you need to remember that it’s still a job that requires professional expertise. That’s precisely the reason why we tend to hire professionals to do the work.
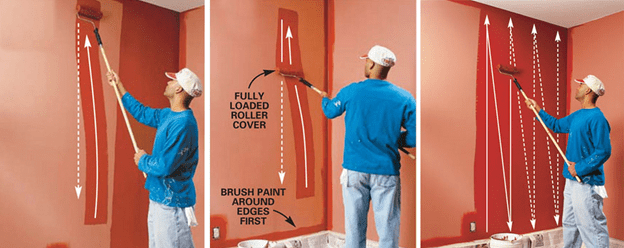
If you want to get the job done yourself, use the professionals’ technique, such as the W or Zig-Zag method. We should follow those methods since it results in quite a smooth finish with little to no effort when you are using a roller.
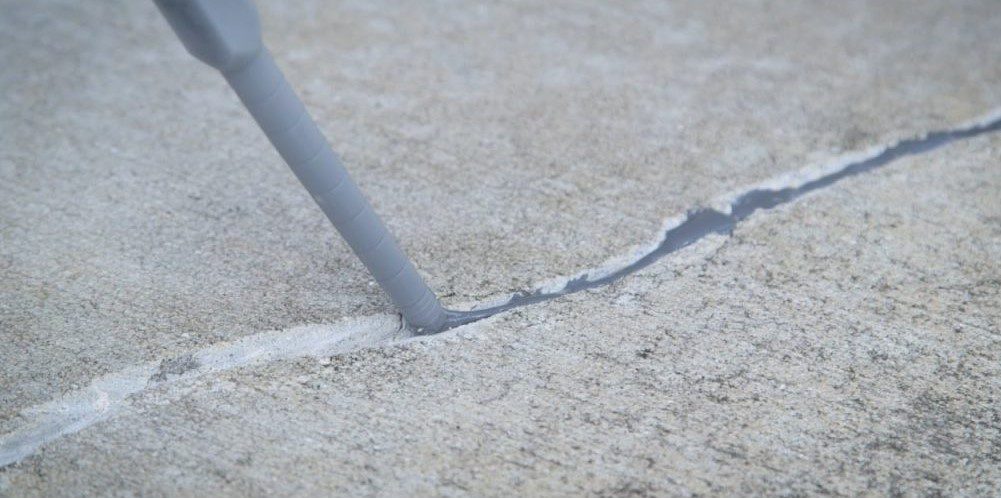
Professional tips
Here’s a pro tip for you. Concrete looks amazing when it has been painted. That’s right. Concrete is porous, dusty, and always gray. It’s an excellent medium for a paint job, and it also looks good when given a color coat.
There are quite a few caveats with this one. It isn’t the best medium for painting, and it’s also not the most controllable medium. Therefore, you would need a special paint. Concrete paint is a bit thinner and soaks greatly into the porous material.
Painter’s tape
Painter’s tape is the one that professional painters use to ensure that the lines are clean and uniform. You’ve probably seen it before, or have a small roll at home. It’s one of the most valuable tools in your arsenal if you’re only starting out your paint journey.
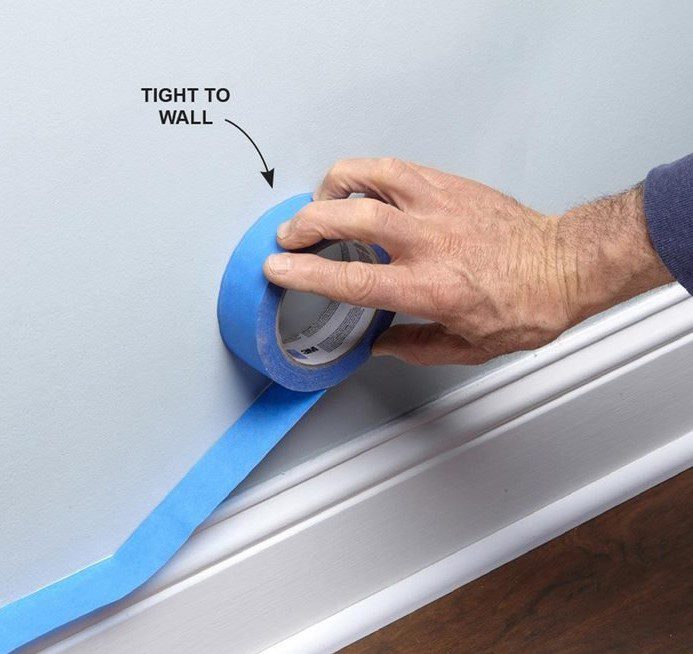
There are many tips for applying painter’s tape, especially for newbies. For example, there are guides to learn from, and making stencils for patterns is also a fantastic option. You only need to peel the tape off before your paint has dried to avoid the paint from chipping on the corners.
Being graceful
Just like all things in life, using and utilizing painter’s tape properly is an art. It’s not just about slapping on the tape, then painting over it, and then ripping the paint off as soon as you’re done with the whole thing.
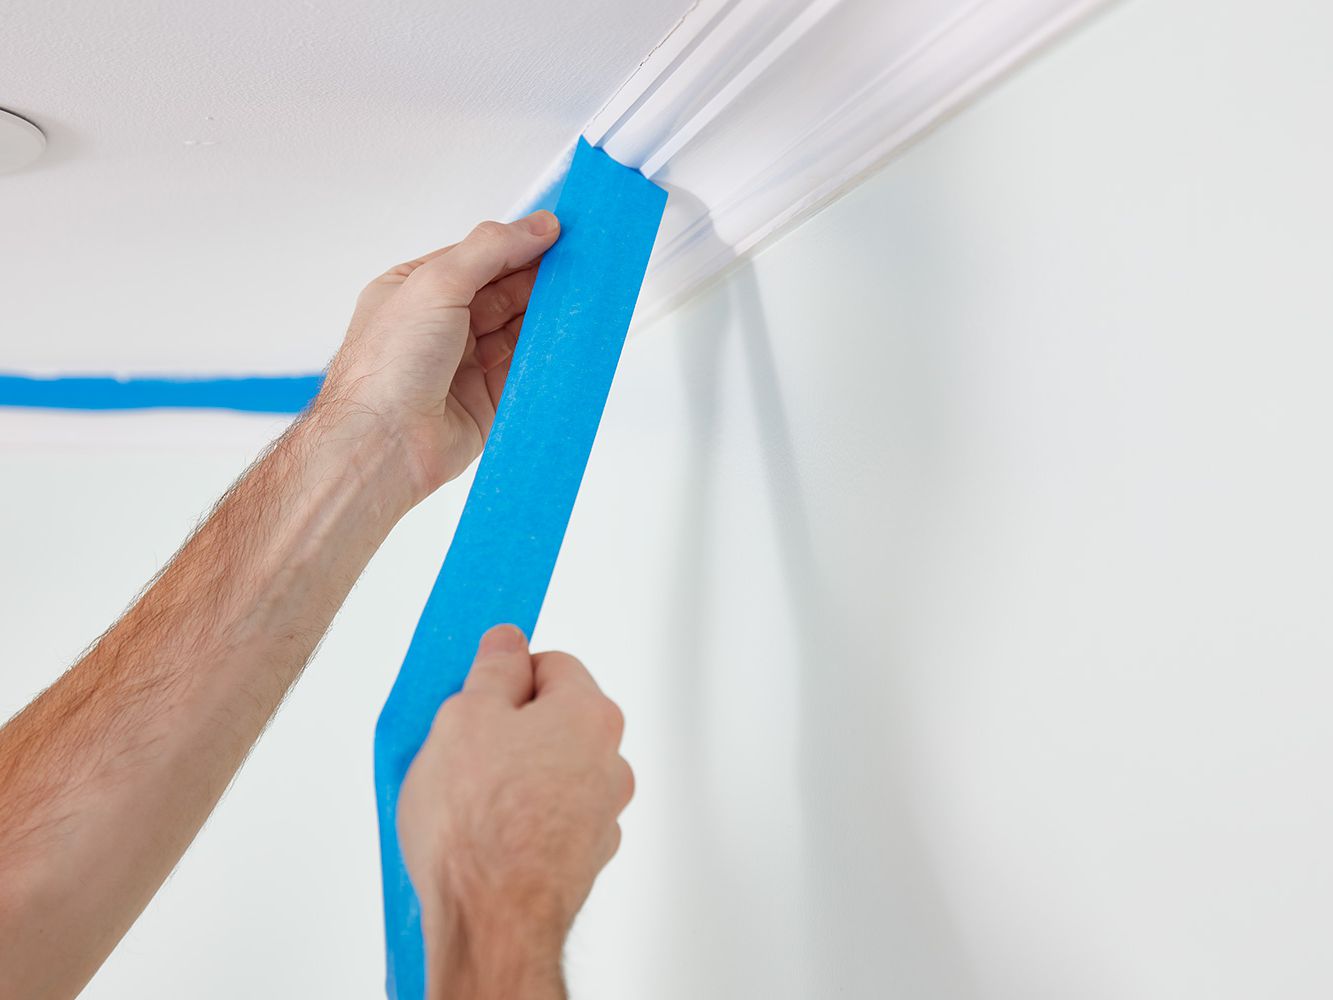
You need to remove the tape slowly; don’t rush it like ripping off a bandage. You need to be graceful with it while also ensuring that the lines are clean. A 45-degree angle is recommended if you want the best results. Keep it at 90 if the tape seems too sticky. Remember: slow and steady.
Caulk for the win
Caulk is widely used for sealing joints against leakage, especially in piping. It’s quite a versatile material that can be used in a plethora of repairs. All in all, it helps ensure good protection. It often helps in seal tiling.
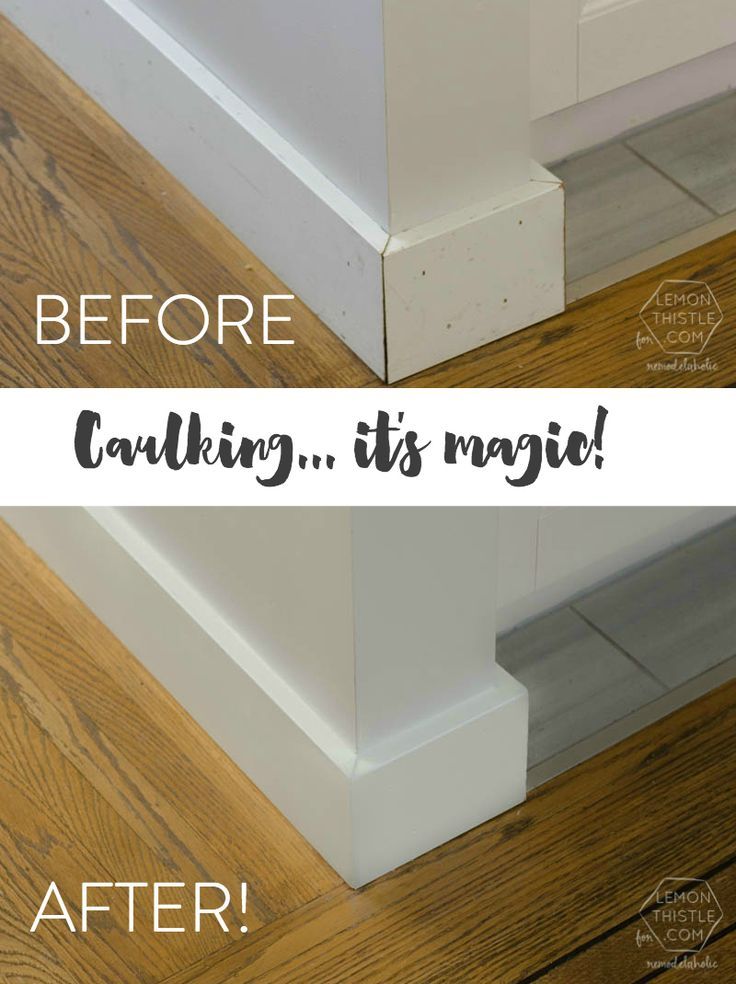
Caulk can be really good for stopping uneven baseboards or trimmed surfaces that didn’t quite fit in properly. Caulk can also pull up uneven surfaces with it when it shrinks and cures, thus, fitting appropriately as well. So, use caulk!
Wax for the win
This time, we have quite the ornamental tip for you all. Even though it’s decorative, it isn’t the easiest thing to do. If you want your home to have a lively vibe even when you’re refurbishing your existing furniture, this tip is for you.
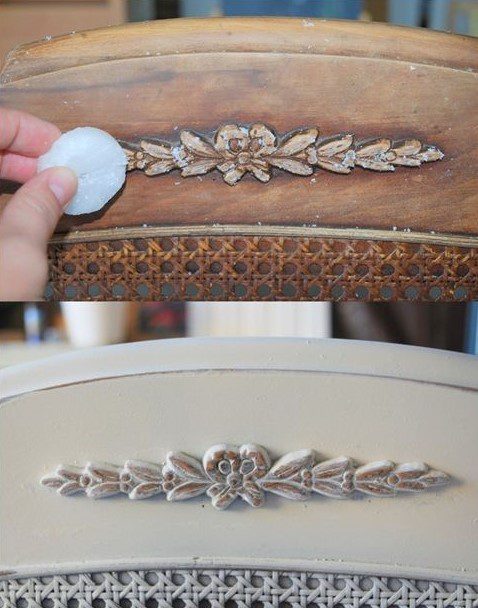
You can get the lively vibe with some wax; well, candle wax, to be precise. It’s easy to get a hold of and does an excellent job. You only need to rub it over the furniture parts and wipe some off of it so that the wood can show through. That’s pretty much it!
Lint rollers
Anybody who has even the slightest amount of knowledge of commercial painting or even about large-scale canvas painting knows very well that the roller brushes that come with it aren’t so smooth. Some things need to be done before that.
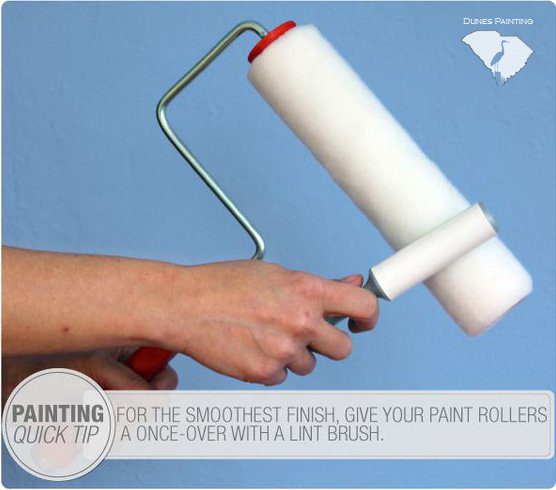
Sadly, a new rolling brush often tends to be riddled with the bits stuck on the wall or those that leave those annoying marks. If you use a self-adhesive lint roller on the brush before beginning, things will be smoother for you!
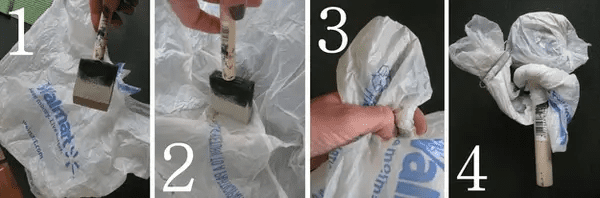
Plastic wraps for the win
By now, most of you know that you should cover and preserve various types of paintbrushes. Now, you can also keep custom shades in relatively smaller containers, but in that case, what would you do about the leftover material like the paint tins?

It’s easy. You can deal with that with the help of some plastic wrap. If you close the tin without that cover, the paint will dry and seal it shut. Here, the plastic wrap seals the can and keeps it fresh until whenever you need to use it next.
DIY hack
Let’s assume that you’ve finished your paint project and you’re now cleaning things up. You have sanded every surface down, and you have also wiped up all the mess. But, how would you deal with cleaning the brushes? Quite a hassle, right?

People usually use a solvent or paint thinner to clean their brushes. But, immersing the brush in a tub of hot vinegar for 30 minutes does a fantastic job without the use of harsh chemicals. Rinse it off with soapy water, and there you go. Your brush is as good as new.
Trimming
Honestly, there’s a lot of preparation that helps make sure that your paint roller doesn’t mess the wall up since it’s actually supposed to improve it. You need to be really careful since there’s lint rolling the surface, and, oh yes, there’s post-paint maintenance, too.
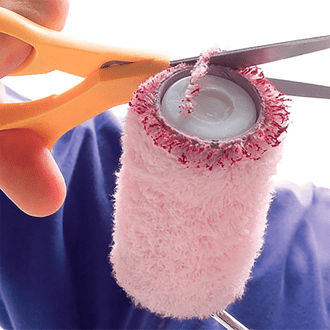
The edges are always getting crusty, but using a new roller brush after every use doesn’t seem like a convenient solution, either. Well, worry no more because you only need to trim those pesky edges to reduce the hassle and save money on new rollers.
Gold
Even the tiniest bits of gold accents can help add a lot of style to your remodeling jobs. You can either choose to take a small brush and add all the details to everything (boring), or you can just take some gold spray and paint everything in a single go!
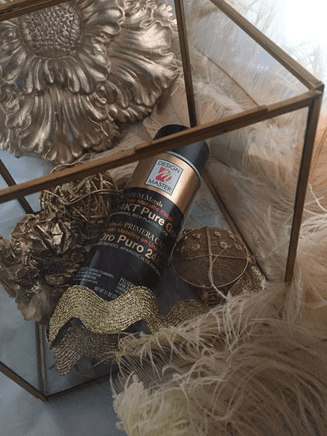
If you want to add some class and elegance, use gold sprayed accents with your paintings. If you ask us, we’d say that a metallic gold spray would be the best option since it gives quite a realistic look, and the graininess of the spray paints also helps in that case.
Vanilla essence
Oddly enough, many people in this world really love the smell of paint. They love painting so much that they’d buy a bucket of it only for being around its scent. It’s pretty weird, but hey, there’s nothing wrong with it. But, other people are repulsed by it.
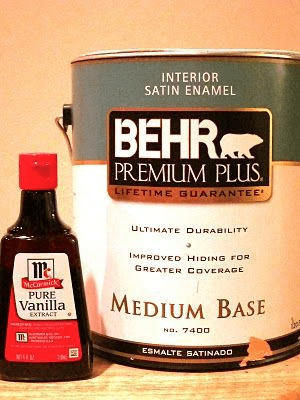
If you’re among those who aren’t fond of the smell of paint, then mixing some vanilla extract (one tablespoon to be precise) with every gallon of paint will impart quite an amazing vanilla fragrance into the walls. How cool is that?
Reusing for the stickiness
If there is one thing that is absolutely essential for painting, it’s tape. Tape is widely used by both rookie and pro painters. It is such a necessary part of painting since it ensures that the finishes are neat and even.
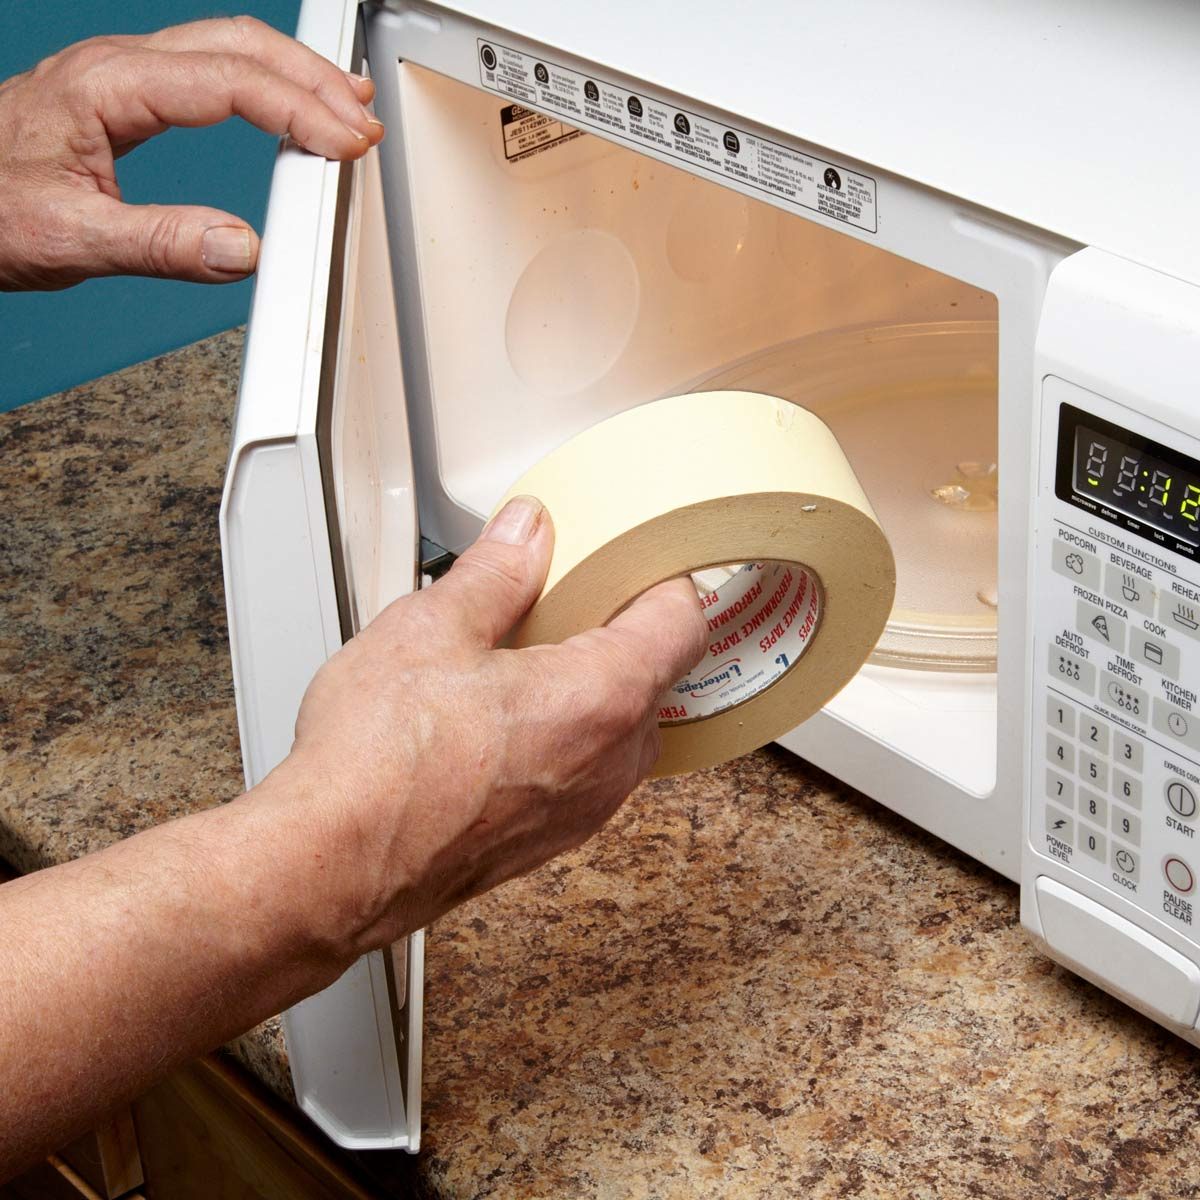
It would be amazing to have all the tape one could get in preparation since the old rolls tend to dry out and become less sticky over time. But, a 10-second stint in the microwave is more than enough for melting it and making it usable.
Metal hack
Although metal is among the most robust materials, it isn’t the most durable material since it rusts and corrodes quickly. Because of that, it’s crucial to paint or coat your metal tools or utensils for outdoor usage. But regular paint won’t always get the job done.
There’s a way to paint on metal, all thanks to vinegar. Since paint on metal tends to crack, thus, exposing the metal to rusting, a rub down with vinegar right before painting the metal can prevent all that from happening.
Latex paint
Did you know that latex paint doesn’t actually contain latex? It’s a water-based paint that is widely used for painting huge surfaces, primarily for commercial purposes. Latex paint is fantastic for home paint jobs, but the paint does clump sometimes.

In such a situation, thinning is a great option. But, any thinner won’t do the job since some of those might actually ruin the characteristics of the latex paint. Instead, trying Flood Floetrol, a thinner for latex paint, can be a great option.
Spray paint tip
Spray paint is really effective, but it can be too effective. It gets everywhere. When using spraypaint, we need to ensure that we don’t destroy everything around the object we’re painting. Luckily, there are some tricks to help keep things neat.
Here’s a great trick. Take an old cardboard box and use it as a studio! You can put anything you want to be painted inside it and spray away! Trust us, it will stay in the box, and it won’t get everywhere.
Collapsible tent hack
You might want to set up bigger apparatus for the relatively larger items. Honestly, it’s well worth the trouble that it takes to set these things up. When you spraypaint anything without proper prep, it only means that you’ll be having a tough time cleaning up.

In such situations, a collapsible tent seems to be the best option. Anything bigger than what would easily fit in a cardboard box can fit very well in the tent. And once you’re done, you only need to fold the tent for a simple clean-up.
Helpful products
While painting, it’s best to make sure that the surface that you’re painting on is smooth because dents and bumps won’t be your best friend while painting. If you’re painting on old furniture, you need to keep in mind that it’s a mix of dents and bumps.
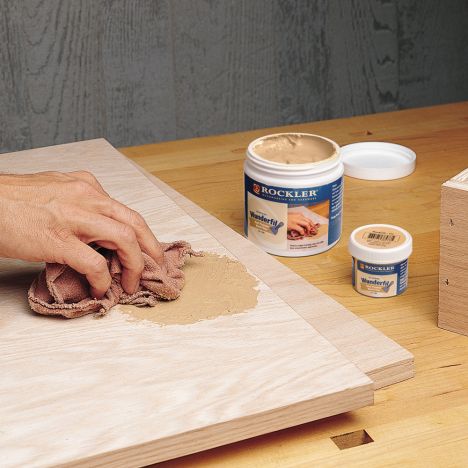
Therefore, we have an excellent product for you that would treat old furniture before you paint on it, and that product is known as Elmer’s Wood Filler. It fills the dents, crevices, and other such things on the wood, providing you with a smooth surface for painting.
Easy fix
While starting to paint something, wiping the excess paint off the brush is a very common practice before beginning. The brush is usually wiped off on the rim of the can, and over time, it layers and gets crusty, sometimes making it hard to close the container.
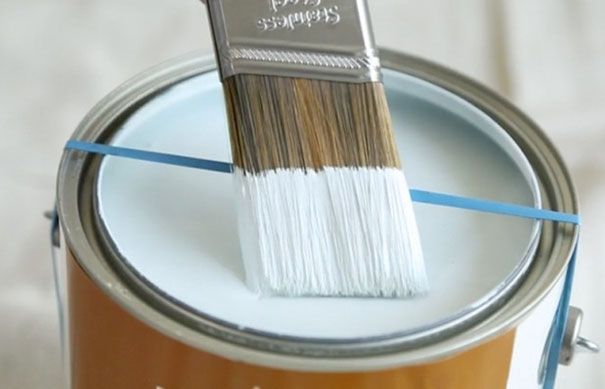
But, minimizing the extra paint and splatter is relatively easy! Instead of pressing the brush to the paint can’s rim, tie a rubber band over the container. Then, wipe off the brush along the rubber band to keep things clean.
Money saver
Like many household repairs, painting can get expensive. Even if you’re doing it yourself, the supplies aren’t always cheap. Especially paint, which can be pricey if you choose longer-lasting or special colors. To save some money on your next paint job, try this hack.
Roller brushes soak up paint…a lot of paint. When you’re done, there’s often a ton of it let on the brush. Thankfully, you can still extract a good amount of paint by scraping the roller down with a bench scraper!
Keeping it simple
There are a lot of painting techniques used all over the world. Apart from the W or Zig-Zag method we mentioned earlier, numerous tips are available for painting things, especially for painting any item of furniture you find in your house.
When painting, it is best to use bold and confident strokes during the job since it lessens the chance of having to paint more layers, and it also helps provide an even finish. Try to paint in a single direction to avoid visible brush strokes on the furniture.
Grease reduction
We have often recommended that everybody ensure that the surface they are painting on is clean and dust-free. And for a good reason. In addition, the walls shouldn’t be greasy, either. Since we know nobody likes to scrub those down, try this hack for an easier job.
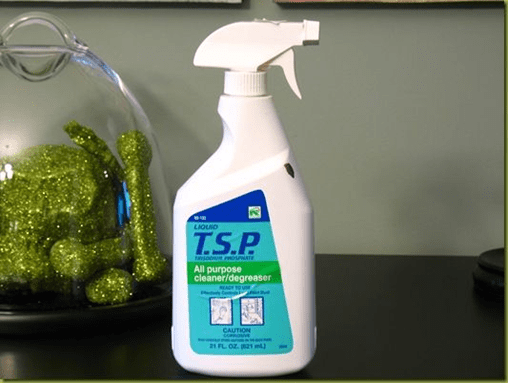
Liquid TSP is a highly recommended product for dealing with greasy surfaces. It’s a heavy-duty all-purpose cleaner that cuts through the greasy dirt deposits from the surface. One wipe down is enough to remove the grease and get you started on your project in no time!
Paper bag hack
After you’ve finished painting, the paint is dry, and the piece is ready for the final touch-ups, you should consider doing a final quality check before setting things in order. A smooth surface is essential for the final check, and bumps shouldn’t be there.
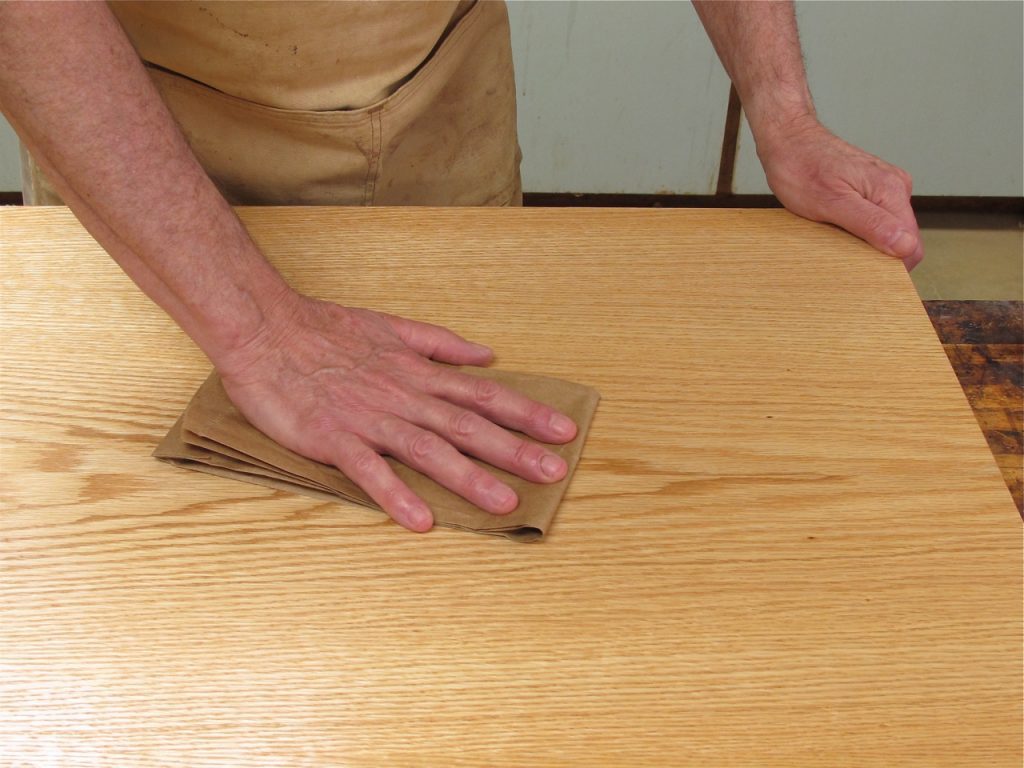
Although it might be tempting, don’t sand down surfaces since it’ll strip the paint. But, a brown paper bag would work really well for a smooth surface. So, rub the surface with a bag just once, and you’re ready for the next step!
Situational best friend
The aftercare is as essential as the paint job if you want to keep your home in excellent condition. If you have children or pets in your home, a quick fix is useful to have on hand for any touch-ups.
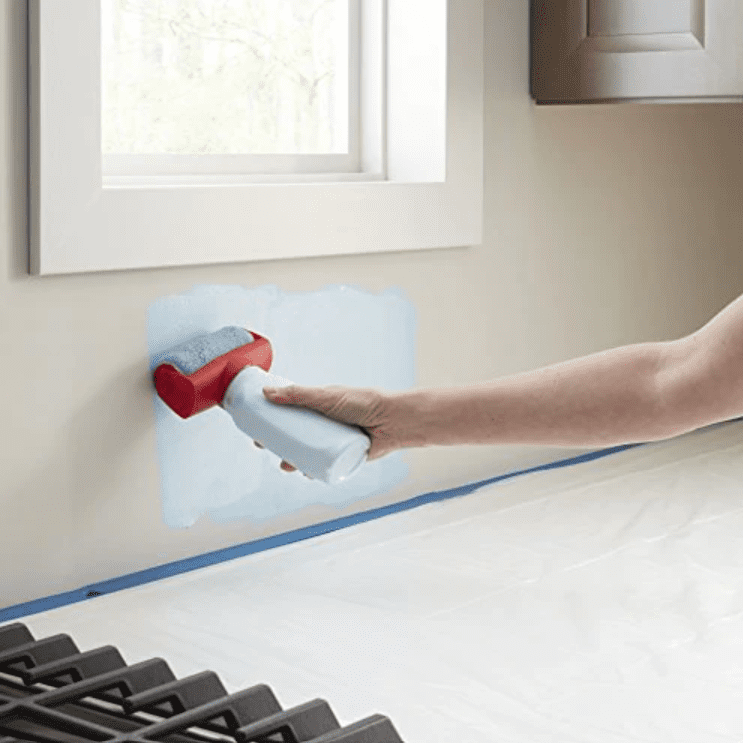
There are many products available that allow you to keep paint on hand conveniently inside the brush. It’s especially useful if you have a shade that’s hard to duplicate, you won’t need to waste time mixing it for each scratch.
Importance of a pen
If the damage done to your paint job is quite complicated, there are many specialized tools that can help solve the problems efficiently. The Rubbermaid Paint Buddy, as we mentioned above, is good in certain situations, but what about the more minor issues?
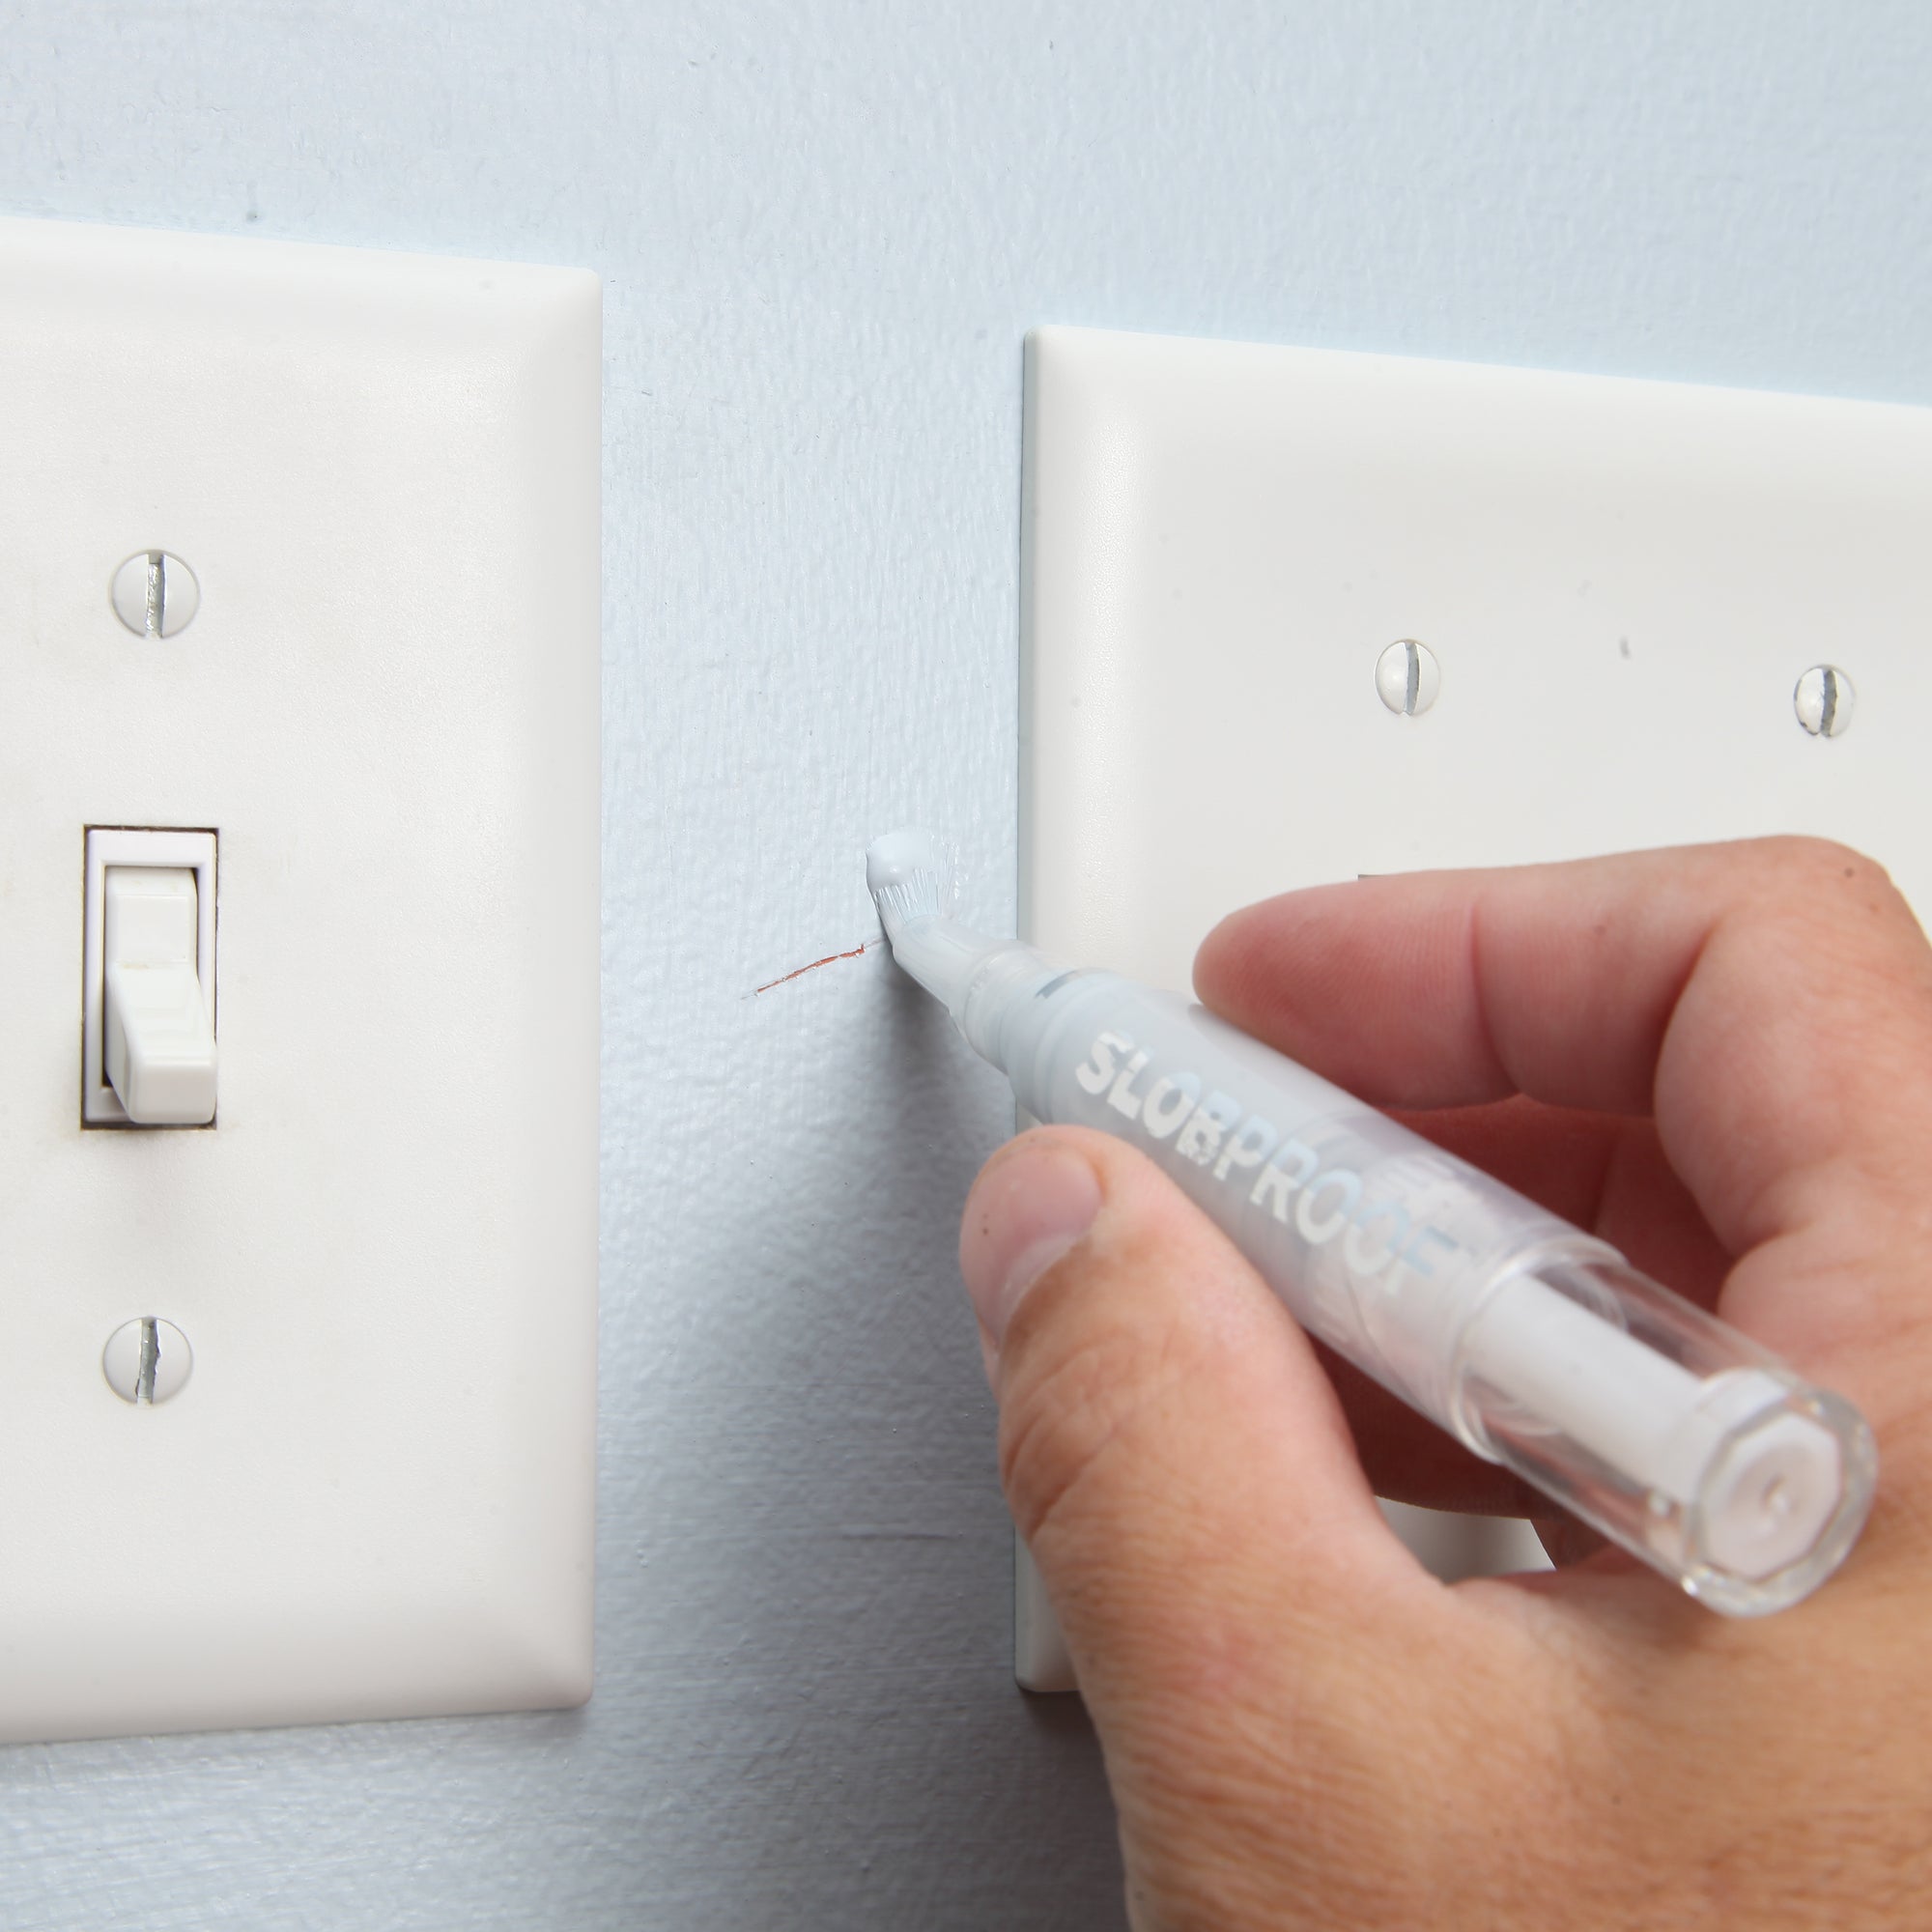
For smaller touch-ups, the Slobproof pen is the perfect tool for the job. You can fill the pen with any latex paint of your choice and use it to fill in the tiny chips that you find between now and the upcoming paint job.
Another easy fix
Plaster is used for covering up the walls, and although it isn’t used as widely today as it used to be, it’s still an excellent option. Plaster forms a chalk-like exterior on the walls. When you apply it, it has quite a pasty texture to it.
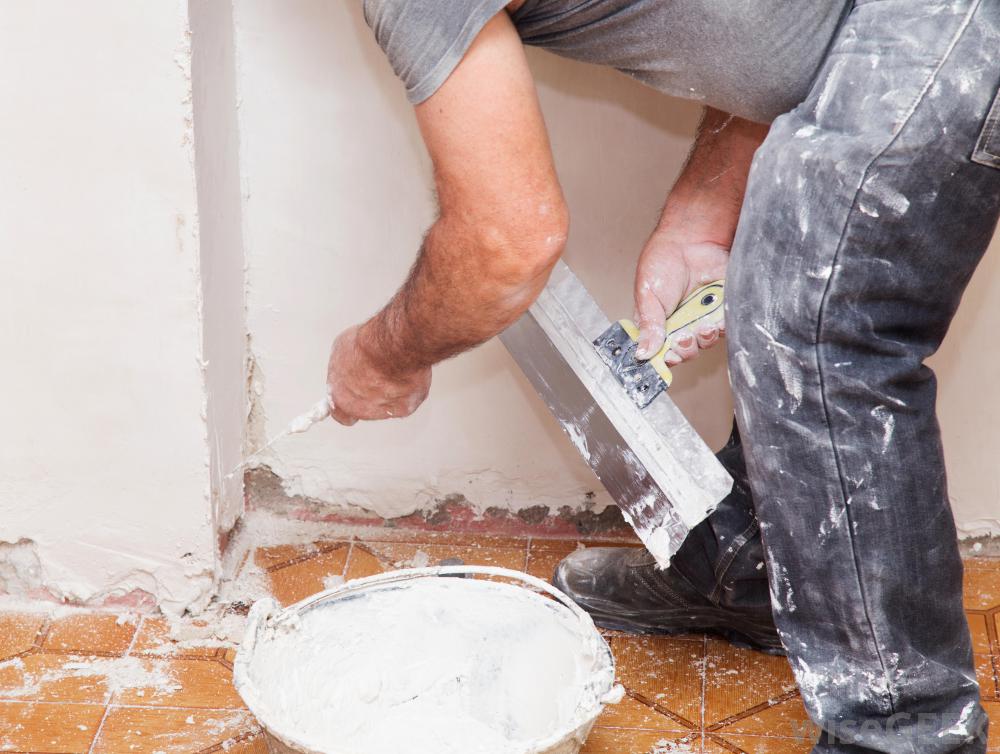
Self-leveling paint is a fantastic equalizer in these situations. It’s self-explanatory, but it has been designed to self-level when it’s applied. Therefore, the uneven surface of the plaster won’t be a problem for its smoothening properties. As we said before, a smooth surface is key to a good paint job.
Be careful
Many of us could argue by saying that paint is just like makeup for a home because, like makeup, we do need particular combinations of products for making the end result look good. Well, how can we tell if we have oil-based or latex paint?

First, you need to check what’s already there in your home. Soak a cotton ball in rubbing alcohol. Then, wipe your walls with it. It’s latex paint if the paint comes away on the cotton. If not, you’re looking at oil-based paint.
The importance of plastic wraps
Plastic wrap is an extremely useful supply to keep in your painting supplies. It’s extremely versatile and can make every step of painting easier and less messy. It’s easily available at any store and is a useful tool for new and experienced painters alike.
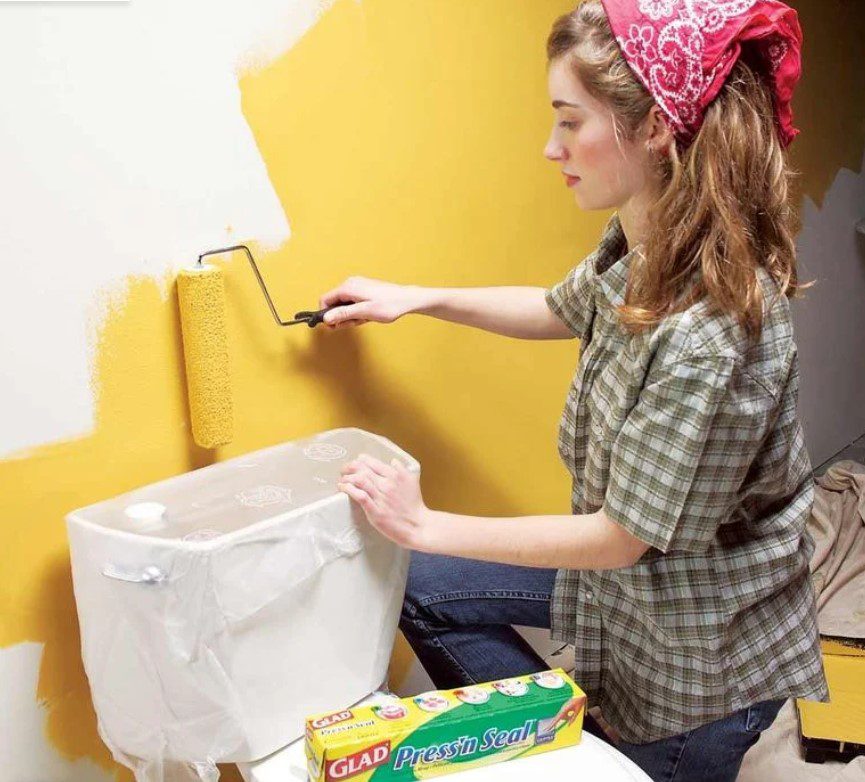
Also, plastic wrap is really cheap and convenient for protecting anything that you don’t want to be painted again. It clings to the object, and it doesn’t even take up extra space. Once you’re done with it, you can quickly dispose of it.
Don’t let the air in
Do you know what the biggest enemy of paint is? It’s the air exposure. When exposed to air, the paint dries irregularly, and rectifying mistakes becomes a massive problem at that point. Well, paintbrushes aren’t an exception since they dry quickly at times.
For that, a plastic bag and rubber band will do just the job of storing away a paintbrush. You only need to wrap the brush in a plastic bag and then tie it off with a rubber band. That’s pretty much it. It will keep it for weeks!